Monday, June 29, 2009
A garden grows in Brooklyn...and Woodstock, and Wilton......
Dark Horse Farm's "Dutch Treat" has made it big! Not just our tomato plants, but it has reached celebrity status as it spreads it's goodness all over the country! "MaryJane's Farm" magazine is doing a feature for it's Aug/Sept. issue this summer, and it has made it's way from Wilton, CT, to Brooklyn and Manhattan, and further north to Woodstock, VT!
Here we have our dear friends, The Stam's of Brooklyn, and their amazing brownstone garden. That's my bestest friend, Lola- isn't she gorgeous! She and her dad have palnted a lovely backyard garden using our compost. It's especially fitting for them to use our Dutch stuff- Ronnie is from Amsterdam, like my horse, Tys, (who makes all of this compost possible... 40 lbs. of it everyday!)
Sue Beneke sent me pics of her garden in Woodstock, and also a picture of another bag-o- brown she had purchased. She knew I would appreciate the graphics on the bag.
Want some of your own "brown gold"? Just give me the word.
**(no fee for the 15 lb. bags, earth worms included)**
Thanks to husband, Tim, for taking time out of his busy photography career, and help me share this organic ground.
Friday, June 26, 2009
Garden of Ideas
Ahhh, the age old question: "Which came first? The garden or the quilt?"
Saturday, June 20, 2009
Katie likes the bed!
That's the lovely Katie Paganelli exactly as I imagine a college gal to look in her "Dorm on a Drawstring". Don't forget to visit "Go make your bed!" We will be having a give away next week- and it's a BIG ONE!
Thursday, June 18, 2009
Rainy Day Project- FLOOR QUILT
It has been raining this month more than ever. In fact we have broken some 80 year old record with over 22 inches since June 1st. I know, all of my Washington and Oregon blog buddies are laughing at me- but we are starting to mold over! Which make me so aware of my most neccsary clothing item- MY WELLIES! I wear them everyday to muck the stalls and paddocks, even in good weather, but on a morning like this I am quite literally up to my ankles in mud! So I decided to make a special spot to house my most precious green rubber iconic wardrobe accessory... Hence the Wellie Mat! Make your own. WARNING- It takes forever for the Mod Podge to dry in 100% humidity! Here I am in my wellies at the ripe old age of 18- and scroll down to the previous post to see I still wear them... YES- that's the same person... sheesh!
This is the book you may need if the following directions I have provided are not clear enough, and some of the tools, plus a plastic sheet to cover your work area, Mod Podge, Clear Satin water based acrylic finish, and paste wax. Use any scraps you have laying around... this has been my mission lately- use them or lose them!
My Wellington Boot Floor Cloth Tutorial- my feeble attempt to teach!
I really don’t see the distinction between a floor cloth and a floor quilt, except for the fact that you use scraps of fabric as opposed to paint. This is the book that taught me, by Ellen Highsmith Silver, and it is worth purchasing if you want to try this. It’s pretty easy, but time consuming. Read the book before starting the project.
Start with 12 oz. artist canvas that is treated on one side only- available at artist supply. Treat other side with gesso- either side can be top or bottom of the cloth/quilt. Let it dry.
Prepare the quilt fabric you intend to use by painting it with a sponge brush and a solution of matte Mod Podge and water- 3:1- 3/4 cup water to 1/4 cup Mod Podge. Let it dry, then set it with a steam iron on high(you may want to use pressing cloth to protect board and iron.)
Cut the fabric as desired. “Glue” the fabric onto either side if the canvas with full strength Mod Podge and then paint over it with the Mod Podge. Let it dry and do it 2 more times, making sure to press out any bubbles or wrinkles with your hands- wash them often. Wait 24 hours, then apply a clear satin water based acrylic protective finish. Let dry and then sand with fine sand paper. Repeat 2 more times. Wait 24 hours. Apply clear paste wax and buff lightly. You can apply a non skid additive to the front and back of the cloth. I was able to get all of my supplies at Jerry’s Artarama which is a standard art supply store.
Monday, June 15, 2009
Ponies -a- Plenty
Ponies, ponies, everywhere! Annie was sporting her Flower Power Anne Flower Mural saddle pad with pom poms, and for those too big to ride or a little timid, there were my hobby horses. They are available, and can be made to order. $50. each (includes shipping) and $40.00 each for multiple orders. Saddle pads too! They are custom order only. General Sis Boom was there to let you know if you were too "grown up" for the pony ride... Annie is a bit fragile! Thanks again to my friend, the angelic Linda Montanaro. (Pony parties are available- (203) 762-7502... glitter on hooves and all!)
Sis Boom Sisterhood
I cannot tell you what a joyous occasion it was at the Sis Boom sale last week. I met so many wonderful people. I am very thankful to have a face, two in fact, to put to my blog buddy at Firefly Hill Style. Anne and her daughter Hannah came all of the way from New Jersey!
Thursday, June 11, 2009
And the winners are.....
I enjoyed your stories so much appreciated the time and thought it took to write them down, that I decided to let the random number website pick 3 winners.
1) Jocelyn from Madison, NJ
2) Sweeter than cupcakes from Laredo, Texas
3) Katmomom Washington state!
Please forward me your full names and mailing addresses and which gift you choose.
Thanks so much for coming by "Dark Horse Farm Designs".
Nancy
Tuesday, June 9, 2009
I have enjoyed your stories so much!
Thanks so much for sharing such touching, harrowing and often times hilarious recollections in the kitchen and out in the pasture. They have been so rewarding that I have decided to choose THREE WINNERS! So- your chances have just increased. You are on your way to being the proud owner of a very low maintenance hobby horse, hot mama hot mitts, or a sweet Victorian girl pillow- all Sis Boom Flower Power inspired. Also, thanks to Jennifer Paganelli for directing her traffic my way!
Thursday, June 4, 2009
RAFFLE!!!! MY FIRST ONE!!!! In honor of the Sis Boom Line "FLOWER POWER!"
Time for you to win a Sis Boom Hobby Horse of your very own... or oven mitts or Victorian girl with horse pillow.
Wednesday, June 3, 2009
Squash Blossoms stuffed with Mozzarella and Anchovies
Your mission today, should you choose to accept it, is to try to use all of the summer squash you’ve planted!
Our first garden was planted in Stone Ridge , New York, about 25 years ago. It was a series of raised beds that we attempted to keep going on our weekends in the country.
Our greatest success was with the asparagus, broccoli, salad greens and squash. As I imagine many inexperienced gardeners do, we planted way too many squash! After all, how much zucchini can one eat?
I was working as a model at the time, and Isabella Rosselini and her husband at the time, John Wiederman, came for a visit with their newborn, Electra. She was overjoyed to see the abundance of blossoms taking over the garden. In that enchanting voice of hers, very reminiscent of her mother’s, told me how to prepare an Italian favorite.
So here is Isabella’s secret family recipe. ( I’m terrible with secrets!)
Forgive my name dropping- I just thought it might encourage some people to try the anchovies. Of course, you may omit. Does she look like she's eaten a few too many here? But honestly- a beauty- inside and out!
How to make Squash Blossoms stuffed with Mozzarella and Anchovies
Pick the squash blossoms, trying to choose the male plants. They have one big stamen.
(Was that too graphic?)
That way the female blossoms still produce a squash!
Shake them free of any bugs and give a quick rinse and pat dry.
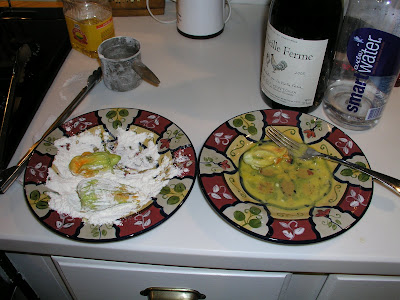
Prepare a plate with a scrambled egg, and one with flour .
Stuff each blossom with an anchovy and a cube of cheese.
Roll first in egg, then in flour, twisting the end of the blossom closed.
Fry until golden on all sides in vegetable oil, like canola.
Drain on a paper bag and enjoy while warm.